How to Customize Storage Bins With Labels and Dividers
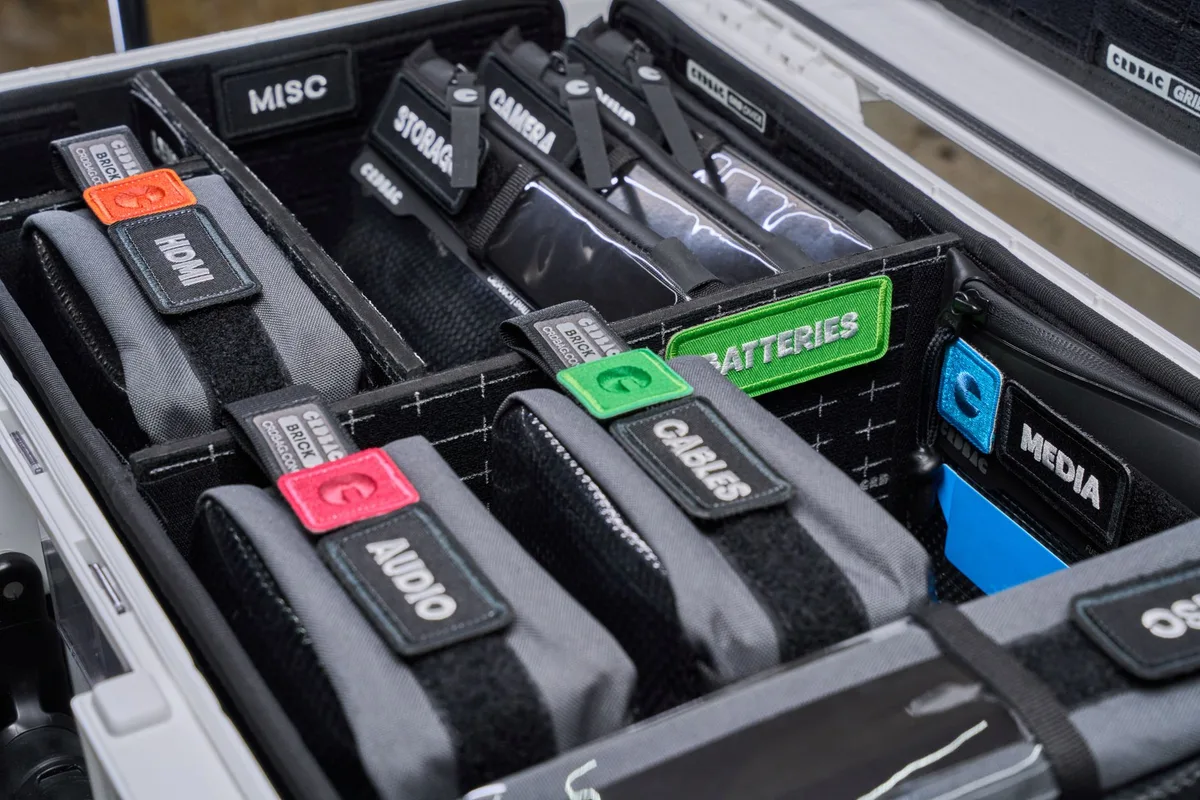
Let me guess. You’ve got a garage full of plastic bins. Or a closet stacked with totes.
And every single one of them is a mystery box. You lift the lid, dig through three layers of random stuff, and still can’t find the extension cord or the holiday decorations you actually need.
I’ve been there. It’s frustrating. But here’s the good news: you can fix this in a weekend.
Customizing storage bins with labels and dividers transforms chaos into a system that actually works. No more guessing. No more dumping everything out.
Just grab and go.
In this guide, I’ll walk you through the exact process. We’ll cover materials, labeling strategies, divider types, and the best practices that keep your system organized for years. Let’s get started.
Why Customizing Storage Bins Matters More Than You Think
Most people buy bins, toss stuff inside, and call it organized. That’s not organization. That’s just hiding clutter in a plastic box.
Customizing your bins with labels and dividers does three critical things. First, it saves time. You know exactly what’s in each bin without opening it.
Second, it protects your items. Dividers keep fragile things from banging together. Third, it makes maintenance easy.
When everything has a home, putting things away takes seconds.
Think about your kitchen. You wouldn’t throw all your utensils into one drawer without dividers. Same logic applies to storage bins.
The difference between a chaotic pile and a functional system is just a few hours of setup.
Choosing the Right Storage Bins for Customization
Before you buy labels and dividers, you need the right foundation. Not all bins are created equal.
Clear vs. Opaque Bins
Clear bins win every time. You can see contents at a glance. That’s a huge advantage even with labels.
Opaque bins force you to rely entirely on your labeling system. If a label falls off, you’re back to square one.
I recommend clear polypropylene bins. They’re durable, stack well, and don’t get brittle over time. Avoid cardboard boxes or flimsy plastic totes.
They won’t hold up to stacking or repeated use.
Size Considerations
Match bin size to what you’re storing. Small bins (5, 10 gallons) work for tools, craft supplies, or seasonal decor. Medium bins (15, 20 gallons) handle clothing, camping gear, or kitchen overflow.
Large bins (30+ gallons) are for bulky items like holiday decorations or sports equipment.
Here’s a rule I follow: never buy bins deeper than your arm can reach. If you have to dig past your elbow, you’ll avoid using that bin. Stick to depths of 18 inches or less for everyday access.
Lid Types Matter
Snap-lid bins seal tight and stack well. But they’re annoying to open frequently. Hinged-lid bins are better for items you access regularly.
For long-term storage, snap lids keep dust and pests out.
Consider gasket-sealed bins for basements or garages. They keep moisture out. That’s critical if you’re storing documents, electronics, or fabrics.
Essential Materials for Your Customization Project
You don’t need fancy tools. Here’s what I use for every bin project:
- Label maker or printable label sheets, A thermal label maker (like a Brother or Dymo) gives clean, durable labels. Printable sheets work too, but you’ll need clear packing tape to protect them.
- Adhesive labels, Choose matte or glossy depending on your bin surface. Matte works better on textured plastic.
- Permanent marker, For quick, temporary labels. Not ideal long-term but great for testing a system.
- Dividers, Adjustable plastic dividers, foam board, corrugated plastic, or even repurposed cardboard.
- Measuring tape, For precise divider placement.
- Ruler and straight edge, For cutting dividers cleanly.
- Utility knife or scissors, Depending on your divider material.
- Adhesive Velcro strips, For attaching dividers that need to be removable.
- Hot glue gun, For permanent divider installation.
That’s it. You probably already own half of this stuff.
Step 1: Plan Your Storage System Before You Touch a Label
Don’t start sticking labels on bins yet. Planning prevents mistakes. Here’s the process I use.
Inventory Everything
Pull everything out of your bins. Sort items into categories. Be specific.
“Holiday decorations” is too broad. Break it down: “Christmas tree ornaments,” “Halloween lights,” “Thanksgiving tableware.”
Write each category on a sticky note. Group related categories together. This becomes your bin assignment list.
Assign Bins by Frequency of Use
Think about how often you access each category. Daily or weekly items go in easy-to-reach bins. Seasonal items go higher or deeper.
Rarely used items go in the back or on top shelves.
For example, holiday decorations might only come out twice a year. They can go in a hard-to-reach spot. But your kids’ art supplies?
Those need front-row access.
Create a Master Inventory List
This is the step most people skip. Don’t skip it. Write down every bin number or name and its contents.
Keep this list digitally or on paper. When you need something, check the list first. No more lifting lids.
I use a simple spreadsheet. Column one is bin number. Column two is contents.
Column three is location (garage shelf A, basement rack 3, etc.). Update it whenever you change contents.
Choosing the Right Labeling System
Labels are the backbone of your system. A good label tells you what’s inside without opening the bin. A great label also tells you where the bin belongs.
Label Maker vs. Handwritten Labels
Label makers produce professional-looking results. They’re fast, consistent, and the adhesive is designed for plastic surfaces. A basic Brother P-Touch or Dymo LabelWriter costs around $30, 50.
Worth every penny if you’re labeling more than a few bins.
Handwritten labels work fine for small projects. Use a permanent marker on white adhesive labels or directly on the bin with a paint pen. The key is legibility.
If you can’t read it from three feet away, it’s useless.
Label Material Options
- Paper labels, Cheap but not durable. Moisture ruins them. Use only for indoor, climate-controlled storage.
- Plastic or vinyl labels, Water-resistant and durable. Ideal for garages, basements, or sheds.
- Magnetic labels, Great for metal shelving units. Easy to move around.
- Chalk labels, Reusable. Write with chalk markers and wipe clean when contents change.
For most situations, I recommend vinyl labels. They hold up to temperature changes, humidity, and occasional bumps. You can get them in rolls for label makers or as sheets for printing.
What to Include on Each Label
Don’t just write “Miscellaneous.” That’s useless. Be specific.
- Category name, “Winter Clothing” not “Clothes”
- Subcategory if needed, “Kids’ Winter Jackets & Hats”
- Date, When you packed it. Helps with seasonal rotation.
- Room destination, “Guest bedroom” or “Basement shelf 2”
For bins with multiple small items, list the top three contents. “Craft supplies: glue sticks, googly eyes, pipe cleaners.” That’s enough detail to know if you need to open it.
Step 2: Designing and Applying Labels That Last
A label that peels off in three months is worse than no label. You’ll think the bin is empty or mislabeled. Here’s how to make labels stick.
Surface Preparation
Clean the bin surface thoroughly. Use rubbing alcohol or a degreaser. Even new bins have mold release agents from manufacturing.
Old bins have dust and grime.
Let the surface dry completely. Then apply your label. Press firmly from center to edges.
Avoid touching the adhesive with your fingers. Oils from your skin reduce stickiness.
Label Placement
Put labels on the front and top of each bin. Front labels are for when bins are on shelves. Top labels are for when bins are stacked.
You should be able to read the contents from any angle.
For stacked bins, place labels on the side facing outward. If bins are on deep shelves, put labels on the front edge. Never put labels on the lid only.
Lids get separated from bins.
Waterproofing Your Labels
If your bins live in a garage, basement, or shed, waterproof your labels. Apply clear packing tape over paper labels. Or use a laminating pouch.
For vinyl labels, the material itself is waterproof. Just make sure the adhesive is rated for plastic.
I learned this the hard way. My first labeling project used paper labels in an unheated garage. Three months later, they were unreadable blobs.
Don’t repeat my mistake.
Step 3: Installing Dividers for Maximum Organization
Dividers turn a single bin into multiple compartments. This is where the real customization happens. You can separate items by type, size, or frequency of use.
Types of Dividers
Adjustable plastic dividers are my top recommendation. They clip into the sides of the bin and slide to create custom compartments. Brands like Sterilite and IRIS sell them as accessories.
They’re easy to install and reposition.
Foam board is cheap and easy to cut. Use it for lightweight items like clothing or craft supplies. Cut pieces to fit snugly inside the bin.
They won’t hold heavy items, but they’re perfect for soft goods.
Corrugated plastic (coroplast) is sturdier than foam board. It’s the same material used for yard signs. Cut it with a utility knife.
It holds up well in garages and basements.
Wood or acrylic dividers are for heavy-duty use. If you’re storing tools, hardware, or heavy kitchen items, these provide real structural support. You’ll need basic woodworking skills for custom cuts.
Repurposed cardboard works in a pinch. Cut boxes to size. They’re free and easy to replace.
But they don’t last. Moisture turns them to mush. Use cardboard only for temporary setups.
How to Measure and Cut Dividers
Measure the interior width and height of your bin. Dividers should fit snugly but not so tight that they bow the bin walls.
For adjustable plastic dividers, follow the manufacturer’s instructions. Most clip into channels or slots inside the bin.
For custom dividers, measure twice, cut once. Use a straight edge and utility knife for foam board or coroplast. Score the material first, then snap it.
Sand rough edges with fine-grit sandpaper.
Test-fit the divider before finalizing. It should stand upright without falling over. If it wobbles, trim a quarter inch from the bottom.
Creating a Grid System
For bins with many small items, create a grid. Use dividers running both directions. This gives you multiple compartments.
I do this for hardware bins. Screws, nuts, bolts, and washers each get their own cell. No more digging through a pile to find the right size.
Measure the bin interior. Divide it into equal sections. Cut dividers to fit.
Install the long dividers first, then the short ones. They should interlock at the intersections.
Step 4: Labeling Strategies for Different Storage Scenarios
Not all storage needs the same labeling approach. Here’s how to adapt.
Garage and Workshop Bins
Garages are tough environments. Temperature swings, humidity, dust. Use heavy-duty vinyl labels.
Place them on the front and top of each bin.
For tool bins, label by tool type: “Wrenches,” “Screwdrivers,” “Pliers.” For hardware bins, use clear jars inside the bin with their own mini labels. Then label the bin “Hardware: screws, nails, anchors.”
Kitchen and Pantry Bins
Kitchen bins need frequent access. Use large, easy-to-read labels. Consider color-coding by food group.
Red labels for snacks, green for canned goods, blue for baking supplies.
Dividers are essential here. Use them to separate different types of items within the same bin. For example, a “Baking Supplies” bin can have dividers for flour, sugar, and chocolate chips.
Kids’ Room and Toy Bins
Kids need visual cues. Use picture labels alongside text. A photo of a toy car next to the word “Cars” helps non-readers find and return items.
Use low bins for kids. They can reach them without help. Dividers should be removable so you can reconfigure as toys change.
Office and Document Bins
Paper storage needs careful labeling. Use file folders inside bins with tab labels. Then label the bin itself with the date range and category.
“Tax Documents 2020, 2024” is clear and searchable.
Dividers here are vertical file separators. You can buy plastic file dividers or make your own from corrugated plastic.
Step 5: Advanced Customization Techniques
Once you’ve mastered basic labels and dividers, try these upgrades.
Color-Coding Systems
Assign a color to each category. Red for holiday items. Blue for tools.
Green for camping gear. Use colored labels or colored bins.
Color-coding works because your brain processes color faster than text. You’ll find yourself reaching for the right bin without reading the label.
QR Code Labels
This is next-level. Print QR codes that link to a digital inventory. When you scan the code, you see a full list of contents, photos, and even purchase dates.
I use this for my holiday decoration bins. Each bin has a QR code. Scanning it shows me exactly which ornaments are inside.
No more opening five bins to find the angel tree topper.
You can generate QR codes for free online. Link them to a Google Doc, spreadsheet, or Notion page. Update the digital list when contents change.
Barcode Systems
For serious organization, use barcodes. Pair them with an inventory app like Sortly or Home Inventory. Scan the barcode to see contents, value, and location.
This is overkill for most homes. But if you have a large collection of tools, books, or inventory for a small business, it’s a game-changer.
Step 6: Installing Dividers for Different Bin Types
Not all bins accept dividers the same way. Here’s how to handle common scenarios.
Standard Rectangular Bins
These are the easiest. Most have smooth interior walls. You can use adhesive-backed divider clips or create friction-fit dividers.
For friction-fit dividers, cut your material slightly wider than the bin interior. The pressure against the walls holds them in place. No adhesive needed.
Bins with Slotted Walls
Some bins have built-in slots or channels. These are designed for dividers. Measure the slot spacing and buy compatible dividers.
Sterilis and IRIS both make slotted bins with matching divider sets.
If you can’t find official dividers, cut your own from corrugated plastic. Slide them into the slots. They’ll stay put.
Stackable Bins with Lids
Stackable bins need dividers that don’t interfere with stacking. Use low-profile dividers that sit below the lid rim. Test that the lid closes fully before committing.
For deep bins, consider tiered dividers. These create multiple levels inside the same bin. You can store lighter items on top and heavier items below.
Step 7: Creating a Maintenance Routine
A customized storage system isn’t set-and-forget. It needs occasional maintenance.
Quarterly Reviews
Every three months, check your bins. Are labels still readable? Are dividers still in place?
Has the contents changed?
Remove any bins that no longer serve a purpose. Donate or discard items you haven’t used in a year. Update labels when contents change.
Seasonal Rotation
Twice a year, rotate seasonal bins. Move winter gear to the back in spring. Bring summer items forward.
Update your master inventory list.
This is also a good time to check for pests, moisture, or damage. Catch problems early before they spread.
Label Updates
When you add or remove items, update the label immediately. Don’t wait. You’ll forget.
Keep a roll of blank labels and a marker near your storage area.
If you use a label maker, print a few extra labels for each category. Store them in a labeled envelope taped to the inside of the bin. When you need a replacement, it’s right there.
Step 8: Common Mistakes and How to Avoid Them
I’ve made every mistake in the book. Here’s what to watch out for.
Mistake 1: Labels That Are Too Small
Small labels get lost on large bins. Use labels that are at least 2 inches tall. The text should be visible from across the room.
Use bold, sans-serif fonts. Avoid cursive or decorative scripts.
Mistake 2: Overcrowding Bins
A bin should be no more than 80% full. Overstuffed bins are hard to close, hard to lift, and hard to organize. Leave room for dividers and air circulation.
If you’re cramming items in, you need more bins or smaller categories.
Mistake 3: Using the Wrong Adhesive
Not all labels stick to plastic. Some adhesives fail in heat or cold. Test a label on a small area first.
Leave it for 24 hours. If it peels off, try a different brand.
For problem surfaces, use double-sided tape or adhesive Velcro strips to attach label holders. These are plastic sleeves that hold paper labels. Replace the paper without replacing the adhesive.
Mistake 4: Forgetting About Accessibility
Dividers are great, but they can make items hard to reach. Leave enough space to grab items without removing the divider. For deep bins, use dividers that are removable or hinged.
I once made a bin with fixed dividers that were too tall. I couldn’t reach items at the bottom without pulling the dividers out. That defeated the purpose.
Now I use dividers that are two-thirds the bin height.
Step 9: DIY Divider Projects for Specific Needs
Sometimes store-bought dividers don’t fit. Here are DIY solutions.
Foam Board Dividers for Clothing
Cut foam board to bin dimensions. Cover with fabric or contact paper for a finished look. These dividers are lightweight and won’t damage delicate fabrics.
Use them to separate shirts from pants, or winter from summer clothes. They’re also great for linens. Separate sheets, pillowcases, and towels within the same bin.
Corrugated Plastic for Heavy Items
Coroplast is tough. Cut it with a utility knife and straight edge. It won’t bend under the weight of tools or canned goods.
For extra stability, create a frame. Cut two pieces that fit the bin width. Cut notches in each piece so they interlock.
This creates a cross-shaped divider with four compartments.
Wood Dividers for Workshop Bins
Wood dividers are permanent but strong. Use 1/4-inch plywood or MDF. Cut to size with a jigsaw or circular saw.
Sand edges smooth.
Attach wood dividers with small screws or construction adhesive. Make sure screws don’t poke through the bin walls. Pre-drill holes to prevent cracking.
Wood dividers are ideal for heavy tool bins. They won’t flex or break under weight.
Step 10: Labeling and Dividing Specific Bin Types
Let’s get specific. Here’s how to handle common storage scenarios.
Holiday Decoration Bins
These are the worst offenders. One bin labeled “Christmas” hides ornaments, lights, wreaths, and wrapping paper. That’s four categories in one bin.
Use dividers to separate ornaments from lights. Ornaments go in one section, wrapped in tissue paper. Lights go in another section, coiled and tied.
Wreath hooks and hangers go in a third section.
Label the bin “Christmas: Ornaments, Lights, Hooks.” Inside, each divider section gets a mini label. This way you can grab exactly what you need without disturbing the rest.
Tool and Hardware Bins
Tools are heavy. Use sturdy dividers. Wood or thick coroplast works best.
Separate hand tools from power tools. Within hand tools, group by type: wrenches, screwdrivers, pliers. Use small dividers to keep each group separate.
For hardware, use small containers inside the bin. Baby food jars, pill bottles, or compartment boxes work great. Label each container.
Then label the bin “Hardware: screws, nuts, washers.”
Craft and Hobby Bins
Craft supplies are varied and small. Use many small dividers. Create compartments for beads, threads, buttons, and ribbons.
Consider using a bin with a removable tray. Store frequently used items in the tray. Store bulk supplies below.
Label both the tray and the main bin.
Seasonal Decor Bins
These bins get opened once or twice a year. Make them easy to navigate. Use dividers to separate fragile items from sturdy ones.
Wrap fragile items in bubble wrap or tissue paper. Label each wrapped item.
For Christmas decorations, I use one bin for lights, one for ornaments, and one for tree toppers and garlands. Each bin has dividers. Ornaments are in egg cartons or compartment boxes inside the bin.
Step 11: Digital Tools to Complement Your Physical System
Physical labels are great. But digital tools make your system searchable.
Inventory Apps
Apps like Sortly, Home Inventory, or even a simple Google Sheet let you catalog every bin. Take photos of contents. Add notes about condition or value.
When you need something, search the app. It tells you which bin and where. No more wandering around the garage.
Barcode and QR Code Generators
Free online tools generate QR codes and barcodes. Print them on adhesive paper. Stick them on your bins.
Link each code to a digital record.
I use QR codes for my workshop bins. Scanning the code shows me a photo of the contents and a list of every item. It takes 10 minutes to set up and saves hours of searching.
Step 12: Maintaining Your System Long-Term
A customized storage system isn’t a one-time project. It’s a living system that evolves with your needs.
Annual Deep Clean
Once a year, empty every bin. Clean the bins inside and out. Inspect for cracks, broken lids, or damaged dividers.
Replace anything worn out.
Reassess your categories. Have your needs changed? Do you need more bins for a new hobby?
Fewer bins for a downsized collection?
Label Refresh
Labels fade over time. Sunlight, temperature changes, and handling all take a toll. Replace faded or peeling labels during your annual clean.
If you use a label maker, keep the original template. Reprinting is quick. If you handwrite labels, keep a master list of label text so you can rewrite them consistently.
Divider Adjustments
Dividers shift over time. Check them during your quarterly review. Tighten any that have loosened.
Replace broken dividers immediately.
If you find yourself constantly rearranging dividers, your system needs adjustment. Maybe the categories are wrong. Maybe the bin size is wrong.
Don’t force a bad system. Redesign it.
Step 12: Real-World Examples of Customized Bins
Let me show you how this works in practice.
Example 1: The Garage Tool Bin
I have a bin labeled “Power Tools: Drills, Saws, Sanders.” Inside, I use three corrugated plastic dividers. Each tool sits in its own compartment. The drill has a separate compartment for bits and chargers.
The label is vinyl, placed on the front and top. The bin lives on a shelf at waist height. I can grab the drill without touching the saw.
Example 2: The Holiday Decor Bin
This bin is 30 gallons. Inside, I have four foam board dividers. One section for lights, one for ornaments, one for tree toppers, and one for wreath hooks.
Ornaments are in egg cartons. Lights are on cardboard spools. The label reads “Christmas: Lights, Ornaments, Toppers, Hooks.” I also have a QR code linking to a photo of each section.
Example 3: The Kids’ Art Supply Bin
This bin is shallow and wide. Inside, I have adjustable plastic dividers creating six compartments. Each compartment holds a different supply: crayons, markers, colored pencils, glue sticks, scissors, and stickers.
The label is a picture of each item next to the word. My four-year-old can find and return items without help. That’s the goal.
Step 13: Troubleshooting Common Issues
Even with a good system, problems arise. Here’s how to fix them.
Labels Keep Falling Off
Switch to a stronger adhesive. Look for labels rated for “low surface energy” plastics. These are designed for polypropylene and polyethylene bins.
If labels still fall off, use label holders. These are plastic frames that attach to the bin with screws or adhesive. The label slides inside.
Replace the label without replacing the adhesive.
Dividers Won’t Stay in Place
Friction-fit dividers need tight tolerances. If they’re loose, add adhesive Velcro strips to the ends. The Velcro grips the bin walls.
For permanent dividers, use hot glue. Apply a bead along the bottom edge. Press the divider into place.
Hold for 30 seconds. Hot glue bonds well to plastic and is removable with isopropyl alcohol.
Bins That Don’t Fit Standard Dividers
Odd-shaped bins need custom solutions. Measure the interior at multiple points. Create a template from cardboard.
Transfer the template to your divider material.
For round bins, use circular dividers. Cut a circle of coroplast slightly smaller than the bin diameter. Cut a slit from the edge to the center.
Overlap the edges to create a curved divider that fits the bin wall.
Step 14: Integrating Labels and Dividers with Existing Shelving
Your storage system doesn’t exist in isolation. It lives on shelves, in cabinets, or on racks. Coordinate your bin labels with shelf labels.
Shelf Labels
Label each shelf with its contents. “Shelf 1: Holiday Decor” “Shelf 2: Camping Gear.” This helps you return bins to the right spot.
Use the same label material and style as your bin labels. Consistency makes the system intuitive.
Zone Labels
Create zones in your storage area. “Seasonal Zone,” “Tool Zone,” “Sports Zone.” Label each zone with a large sign. Within each zone, bins follow the same labeling pattern.
Zones help visitors and family members find and return items. They also help you maintain the system. If a bin is in the wrong zone, you notice immediately.
Step 15: Maintaining Your System Over Time
A good system adapts. Here’s how to keep yours working.
Monthly Quick Checks
Once a month, walk through your storage area. Open a few random bins. Check that labels are intact and dividers are in place.
Return any bins that are out of place.
This takes five minutes. It prevents small problems from becoming big ones.
Annual Overhaul
Once a year, do a full review. Empty every bin. Clean everything.
Reassess your categories. Donate or discard items you no longer need.
Update your master inventory list. Print new labels if needed. Replace worn dividers.
This is also a good time to reorganize your storage layout.
Involving Family Members
Your system only works if everyone uses it. Teach family members how to read labels and return items to the correct bin. Make it easy for them.
Post a simple guide near the storage area. “Read the label. Open the bin.
Take what you need. Close the bin. Return it to the same spot.”
If kids are involved, use picture labels. Make it a game. “Can you find the bin with the red label?
What’s inside?”
Step 16: When to Upgrade Your System
Your storage needs change over time. Here are signs it’s time to upgrade.
You’re Adding New Categories
If you’ve started a new hobby or acquired new tools, your system needs to expand. Don’t cram new items into existing bins. Add new bins.
Update your master list.
Your Labels Are Fading
Faded labels mean it’s time for a refresh. Don’t wait until they’re unreadable. Replace them proactively.
Your Dividers Are Breaking
Broken dividers mean your system is under strain. Either the dividers are too weak for the contents, or the bin is overloaded. Upgrade to sturdier dividers or split the contents into two bins.
You’ve Outgrown Your System
If you’re constantly adding bins and categories, your system has grown beyond its original design. Start fresh. Empty everything.
Reassess your categories. Buy new bins if needed.
This happens every few years for most people. Don’t fight it. Embrace the reset.
Step 17: Cost Breakdown and Time Investment
Let’s talk numbers. Customizing storage bins doesn’t have to be expensive.
Budget Option
- Labels: Permanent marker on masking tape, $5
- Dividers: Repurposed cardboard, $0
- Total: $5
This works for temporary setups. Expect to replace labels and dividers every few months.
Mid-Range Option
- Label maker: $30, 50
- Vinyl label tape: $10, 15 per roll
- Adjustable plastic dividers: $10, 20 per set
- Total: $50, 85
This is my recommended starting point. Labels are durable. Dividers are adjustable.
The system lasts years.
Premium Option
- Label maker with industrial tape: $60, 100
- Custom wood or acrylic dividers: $20, 50 per bin
- Barcode scanner and inventory software: $100, 200
- Total: $180, 350
This is for serious organizers or small business owners. The upfront cost is higher, but the system is nearly maintenance-free.
Time Investment
- Planning: 1, 2 hours
- Labeling 10 bins: 1 hour
- Installing dividers: 2, 3 hours
- Total: 4, 6 hours for a typical garage or closet
Spread this over a weekend. Don’t try to do everything in one day. You’ll rush and make mistakes.
Step 18: Frequently Asked Questions
Can I use a label maker on textured bins?
Yes, but choose the right tape. Textured surfaces need strong adhesive. Use industrial-strength label tape.
Press firmly for 30 seconds after application.
How do I label bins that are already stacked?
Label the front-facing side of each bin. If bins are stacked three high, label the front of each one. You’ll need to unstack them to read labels on lower bins.
That’s fine for occasional access.
For frequently accessed stacked bins, use labels on the top as well. This way you can read them from above.
What’s the best way to label round bins?
Round bins are tricky. Labels on curved surfaces can peel. Use flexible vinyl labels.
Apply them to the flattest part of the bin. Avoid the curved edges.
Alternatively, use label holders that attach with zip ties or adhesive. These keep the label flat and readable.
Can I use a Cricut or Silhouette for labels?
Absolutely. These machines cut custom shapes and fonts. Use permanent vinyl.
Weed the design and apply with transfer tape.
Cricut labels look professional. They’re great for gift bins or decorative storage. But they take longer than a label maker.
For bulk labeling, stick with a thermal printer.
Step 19: The Psychology of Organized Storage
This might sound strange, but organized storage affects your mindset. When you know where everything is, you feel in control. You waste less time searching.
You buy fewer duplicates.
Customizing bins with labels and dividers is a form of respect for your belongings and your time. It’s a small investment that pays dividends every single day.
I’ve seen people transform their relationship with their home just by organizing their storage. The garage becomes usable. The basement becomes a workshop instead of a dumping ground.
The pantry becomes a functional space instead of a black hole.
Step 20: Final Thoughts on Customizing Storage Bins
You now have everything you need to customize your storage bins with labels and dividers. The process is straightforward. Plan your categories.
Choose your materials. Apply labels correctly. Install dividers that fit.
The result is a storage system that works for you, not against you. No more mystery bins. No more digging through piles.
No more buying duplicates because you couldn’t find what you already own.
Start small. Pick one shelf or one closet. Label five bins.
Install dividers in two of them. See how it feels. I guarantee you’ll want to do the rest.
Your time is valuable. Your belongings are worth protecting. A few hours of customization saves you years of frustration.
Get started this weekend. You’ll thank yourself later.
For more detailed guidance on organizing your home, the National Association of Professional Organizers offers excellent resources and can help you find a certified organizer in your area if you need hands-on assistance.


Similar Posts




















[…] Labels are what make bins work long-term. Without labels, bins become mystery boxes. You’ll open six before finding what you need. […]